
Install Redshift for Houdini – Plugin installation (Windows)
iRender supports automatic activation of Redshift license with Windows operating system. This article will show you how to install Redshift for Houdini (only Windows).
To install Redshift for Houdini
Run the exe file. After installation, Redshift and the Houdini plugin will be installed in the C:\ProgramData\Redshift\Plugins\Houdini default folder.
In case you can not find the ProgramData folder. That’s because it is a hidden folder. You can set Windows to show all hidden files and folders by doing the following:
- Windows 11:
-
- Open File Explorer from the taskbar.
- Select View » Show » Hidden items.
- Windows 10:
-
- Open File Explorer from the taskbar.
- Select View » Options » Change folder and search options.
- Select the View tab and, in Advanced settings, select Show hidden files, folders, and drives and OK.
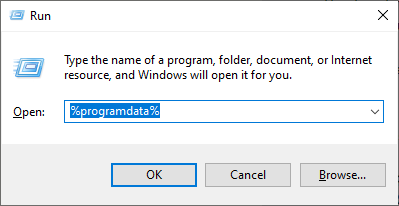
Or you can open ProgramData in a faster way: Press the key combination Windows + R » Fill “%programdata%” » OK.
To use Redshift with Houdini, you’ll need to edit your houdini.env file in the C:\Users\<username>\Documents\houdiniX.X\houdini.env
Add this line:
# —- REDSHIFT —–
HOUDINI_DSO_ERROR = 2
PATH = “C:/ProgramData/Redshift/bin;$PATH”
HOUDINI_PATH = “C:/ProgramData/Redshift/Plugins/Houdini/18.0.597;&”
In the example, it’s 18.0.597. You need to edit it to your Houdini version. That’s it!
In case you open Houdini and still don’t see Redshift bar. Check in C:\ProgramData\Redshift\Plugins\Houdini to see what version is closest to your Houdini version. Then replace it in the houdini.env file.
See more
